How to Clean Laptop Fan: The Ultimate Technical Guide to Fix Overheating
Maintaining your hardware is critical for peak performance, and learning how to clean laptop fan is the first step toward extending your device’s lifespan. Over time, microscopic dust particles and debris accumulate within the cooling assembly, creating a thick layer of grime that obstructs vital airflow. When the fan cannot circulate cool air, the internal temperature of your CPU and GPU skyrockets, leading to a phenomenon known as thermal throttling.
By following a professional cleaning routine, you can eliminate annoying fan noise, prevent unexpected system shutdowns, and restore the lightning-fast speeds your laptop had on day one. This technical guide provides a safe, step-by-step methodology to ensure your internal cooling system remains in pristine condition without risking sensitive electronic components.
Why You Must Learn How to Clean Laptop Fan Regularly
Understanding the mechanics of thermal management helps you realize why knowing how to clean laptop fan is a non-negotiable skill for any power user or gamer. Most modern laptops utilize a high-RPM centrifugal fan paired with copper heat pipes to dissipate the massive heat generated by high-performance processors. When dust clogs the radiator fins, the fan has to work twice as hard, which wears out the motor bearings and drains your battery significantly faster.
Beyond the physical damage, excessive heat can cause permanent degradation of the silicon inside your motherboard, leading to costly hardware failures. A quick 15-minute cleaning session every six months acts as a preventative shield, ensuring that your expensive investment continues to run cool and quiet during intensive tasks.
Essential Tools for Safe Hardware Maintenance
Before you begin the process of how to clean laptop fan, you must gather the correct technical tools to avoid damaging the delicate circuitry. Never use a standard vacuum cleaner or a high-heat hairdryer, as these can generate static electricity that fried motherboards instantly. Instead, invest in a high-quality can of compressed air, which provides a moisture-free, high-pressure stream to dislodge stubborn dust from tight corners.
You will also need a precision screwdriver set, specifically Phillips #00 or Torx bits, depending on your laptop’s specific build. Additionally, having 99% isopropyl alcohol and anti-static brushes on hand allows you to perform a deep clean on the fan blades and the exhaust vents for maximum efficiency.
Recommended Tool Specification Table
| Tool Name | Technical Purpose | Importance Level |
| Compressed Air | Dislodges dust from radiator fins and fan blades. | Critical |
| Precision Screwdriver | Safely removes the bottom chassis and fan housing. | High |
| 99% Isopropyl Alcohol | Dissolves oily residue without leaving moisture. | Medium |
| Anti-Static Brush | Sweeps away loose debris from the fan motor area. | High |
| Microfiber Cloth | Wipes down the exterior vents and internal surfaces. | Medium |
Step-by-Step Guide: How to Clean Laptop Fan Like a Pro
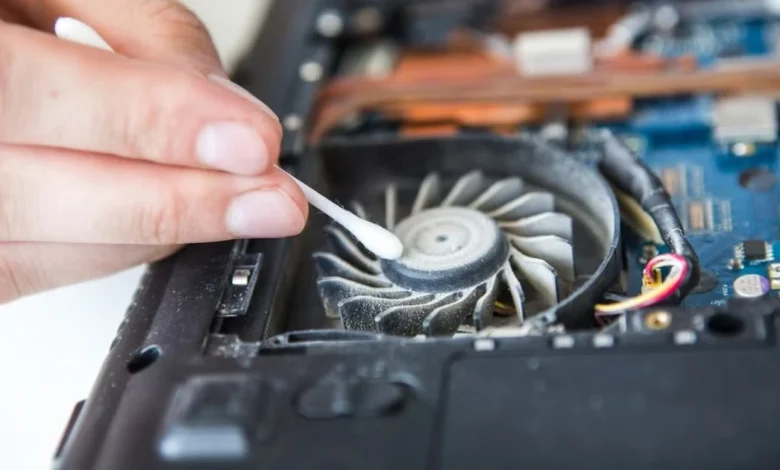
The actual procedure of how to clean laptop fan starts with a complete power-down and disconnecting all external peripherals and charging cables. Once the laptop is off, flip it over and carefully remove the screws from the back panel, keeping them organized in a magnetic tray to avoid losing them.
After removing the chassis, locate the cooling fan—usually a circular plastic housing connected to copper pipes—and use your compressed air in short, controlled bursts. It is vital to hold the fan blade still with a finger or a toothpick while blowing air to prevent the motor from over-spinning and generating a back-current. For a deep clean, use your brush dipped in isopropyl alcohol to gently scrub the individual blades until they are free of any visible grey buildup.
Advanced Maintenance: Beyond Just Dust Removal
Once you have mastered how to clean laptop fan, you might consider the advanced step of replacing the thermal interface material (thermal paste). Thermal paste sits between the processor and the heat sink, and over a period of two to three years, it often dries out and loses its thermal conductivity. If your fan is perfectly clean but your temperatures are still hovering near 90°C, a fresh application of high-grade thermal paste is usually the missing link.
Combining a clean fan with fresh thermal paste can result in a temperature drop of up to 15°C, providing a massive boost to your system’s stability. Always ensure that the fan header is securely reconnected to the motherboard before closing the laptop, as a disconnected fan will lead to immediate overheating upon startup.
Common Mistakes to Avoid During the Process
Many users fail at how to clean laptop fan because they overlook simple safety protocols that protect the internal hardware from static or mechanical damage. One of the most common errors is blowing air into the vents without opening the laptop, which often just pushes the dust deeper into the heat sink rather than removing it.
Another dangerous mistake is using tap water or low-grade rubbing alcohol, which contains water and can cause corrosion on the motherboard’s copper traces. Furthermore, applying too much pressure while scrubbing the fan blades can snap the delicate plastic or misalign the motor shaft. By taking a slow, methodical approach and using the right chemicals, you ensure that the cleaning process is productive rather than destructive to your computer.
(FAQs)
1. Can I use a hairdryer to clean my laptop fan?
No, using a hairdryer to clean your laptop fan is not recommended. Hairdryers produce static electricity and high heat, which can damage sensitive components like the motherboard and plastic parts. Instead, use compressed air or a soft brush for safe cleaning.
2. Will cleaning my laptop fan void the warranty?
In most cases, cleaning your laptop fan does not void the manufacturer’s warranty, especially if you only open the bottom panel. However, breaking any “Warranty Void” seals on internal components like the fan or heat sink may void the warranty. Always check your manufacturer’s policy before proceeding.
3. How often should I clean my laptop fan?
For optimal performance, it is recommended to clean your laptop fan every 6 to 12 months. Regular cleaning helps prevent overheating, improves airflow, and extends the lifespan of your device.
4. Can I use a vacuum cleaner to remove dust from my laptop fan?
No, using a vacuum cleaner is not safe for laptop cleaning. Vacuums generate strong static discharge, which can damage delicate electronic components instantly. Use compressed air cans instead for a safer cleaning method.
5. Why is my laptop fan still loud after cleaning?
If your laptop fan remains noisy even after thorough cleaning, the issue could be worn-out fan bearings or internal damage. In such cases, you may need to replace the fan unit to restore quiet and efficient operation.
Conclusion
In conclusion, knowing how to clean laptop fan is an essential skill that saves you money on repairs and keeps your hardware running at peak efficiency. A clean cooling system ensures that your processor can reach its maximum boost clocks without being hindered by heat-induced performance drops.
By following the technical steps outlined in this guide—from using compressed air to maintaining the fan’s mechanical integrity—you provide your laptop with the airflow it needs to survive years of heavy use. Consistent maintenance is the hallmark of a responsible tech user, and a cool-running laptop is the best way to ensure your productivity remains uninterrupted.